Quickstart
This tutorial walks you through your first HOLMES session: starting the server, calibrating a hydrological model, and exporting your results.
Step 1: Start the Server
Open a terminal and run:
The web interface opens automatically in your default browser. The terminal shows:
INFO:     Started server process [12345]
INFO:     Waiting for application startup.
INFO:     Application startup complete.
INFO:     Uvicorn running on http://127.0.0.1:8000 (Press CTRL+C to quit)
If the browser doesn't open automatically, navigate to http://127.0.0.1:8000.

Step 2: Configure Your Model
The interface opens on the Calibration page. Configure your model using the settings on the left:
General Settings
-
Hydrological model: Select a model to calibrate
- gr4j: The GR4J model - a popular 4-parameter model
- bucket: A simple bucket model for educational purposes
-
Catchment: Select a catchment dataset
- HOLMES includes sample catchments for learning
-
Snow model (optional): Enable snow modeling if the catchment has snow
- cemaneige: The CemaNeige degree-day snow model
- Available only for catchments with temperature data
-
Objective criteria: Choose how to measure model performance
- nse: Nash-Sutcliffe Efficiency (most common)
- kge: Kling-Gupta Efficiency
- rmse: Root Mean Square Error
-
Streamflow transformation: Apply a transformation to emphasize different flow regimes
- High flows: none: No transformation - emphasizes high flows
- Medium flows: sqrt: Square root - balanced focus
- Low flows: log: Logarithmic - emphasizes low flows
-
Calibration start/end: Set the date range for calibration
- Use the "Reset" buttons to reset to the full available range
-
Calibration algorithm: Choose between manual and automatic calibration
- Manual: Adjust parameters by hand using sliders
- Automatic - SCE: Let the SCE-UA algorithm find optimal parameters
Step 3: Run a Manual Calibration
For your first calibration, start with manual mode to understand how parameters affect streamflow:
- Ensure Calibration algorithm is set to Manual
- Adjust the parameter sliders in the Manual calibration settings panel
- Click Run to see the simulated streamflow
The chart on the right shows:
- observations: Measured streamflow (blue line)
- simulation: Model output with your parameters (green line)
- The objective function value (e.g., NSE) tells you how well the model matches observations
Understanding Parameters
Each model has different parameters. For GR4J:
- X1: Production store capacity (mm)
- X2: Groundwater exchange coefficient (mm/day)
- X3: Routing store capacity (mm)
- X4: Unit hydrograph time base (days)
Try adjusting one parameter at a time to see its effect.
Step 4: Run an Automatic Calibration
Once you understand manual calibration, try automatic optimization:
- Set Calibration algorithm to Automatic - SCE
- Adjust algorithm settings if desired (default values work well):
- n_complexes: Number of complexes
- max_evaluations: Maximum function evaluations
- k_stop: Iterations to check for convergence
- p_convergence_threshold: Relative change threshold
- geometric_range_threshold: Parameter space convergence
- Click Start calibration
Watch as the algorithm iteratively improves the parameters. The charts update in real-time showing:
- Parameter evolution over iterations
- Objective function improvement
- Simulated vs. observed streamflow
Click Stop calibration at any time to halt the process.
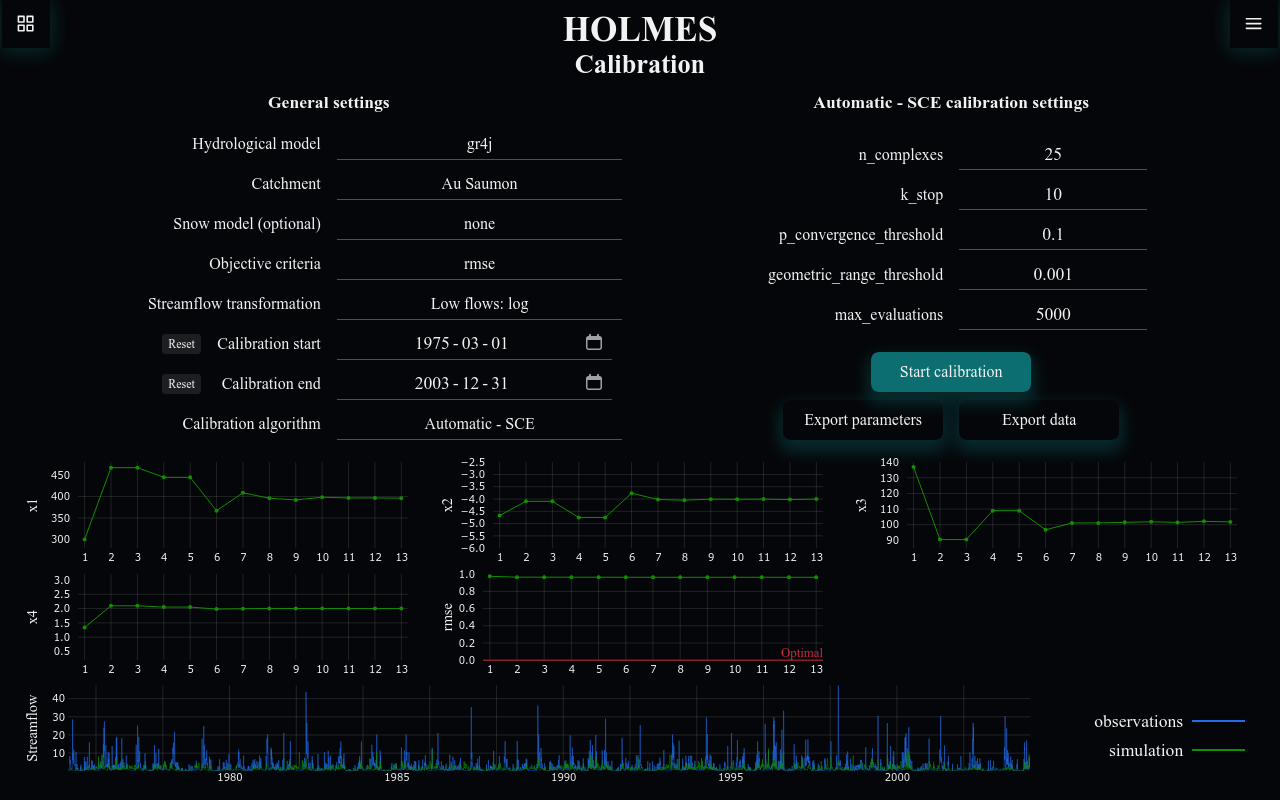
Step 5: Export Your Results
After calibration, export your results for use in simulation or projection:
-
Click Export parameters to save the calibrated parameters as JSON
- This file can be imported into the Simulation or Projection pages
- File format:
catchment_model_params.json
-
Click Export data to save the complete calibration record:
- Parameter evolution during calibration (JSON)
- Timeseries data with observations and simulation (CSV)
Next Steps
Now that you've completed your first calibration:
- Run a Simulation: Use your calibrated parameters on different time periods
- Create Projections: Explore how streamflow might change under climate scenarios
- Explore the Interface: Learn about all available features
- Understand the Models: Learn the theory behind GR4J and other models
Saving Your Work
HOLMES can automatically save your settings between sessions. Enable Allow save in the settings menu (hamburger icon, top right) to persist your configuration.